
Once prepared, the sample proteins are separated by PAGE (polyacrylamide gel electrophoresis), which may be performed under native or denaturing conditions. This section of the Western blotting guide details the considerations you might want to take when separating your proteins.
Overview
SDS-PAGE is typically used for western blotting, where proteins are denatured and reduced to obtain their primary structure. Coating with SDS molecules (Sodium dodecyl sulfate) imparts a relative negative charge proportional to their molecular weight, allowing separation of the protein by size only. Native PAGE omits the use of SDS and is used to observe different protein characteristics. It is rarely further processed by western blot and is more commonly stained with Coomassie or silver. Protein mobility in native PAGE depends on both charge and hydrodynamic size, which is dictated by the polypeptide folding. A small protein, folded in a particular way, could have a greater hydrodynamic size than a larger, more tightly folded polypeptide. In addition, multimeric structure may be preserved.
SDS-PAGE is conducted by introducing the protein into an acrylamide gel matrix and applying an electric current to pull the negatively charged proteins through the gel. The acrylamide gel matrix’s density impedes the proteins’ transit. Smaller proteins pass through the gel quicker than larger proteins, traveling further through the gel during electrophoresis and appearing nearer to the gel’s terminal end. In contrast, larger proteins resist migration and remain closer to the beginning of the gel. Protein markers containing proteins of known sizes can be loaded at the same time as the sample to calibrate the resolved proteins’ size.
Other types of gels that separate proteins by properties other than size are also available. For example isolelectirc focusing gels (IEF) gels separate proteins based on their isoelectric point (pI), which corresponds to the pH at which they have no net charge. These other types of gels generally require specialized buffers and molecular weight markers, in addition to the gel itself.
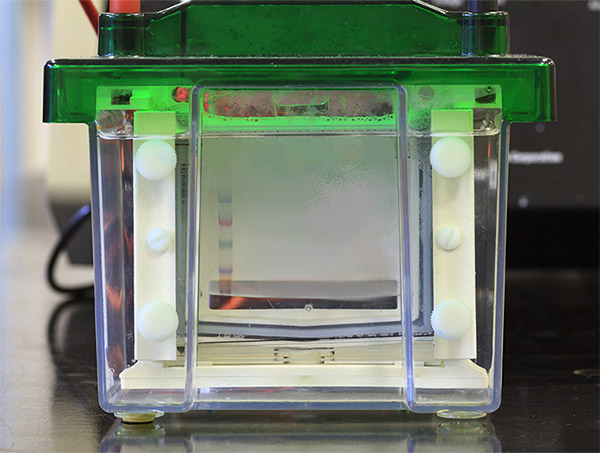
The protein sample is loaded into sample wells, crenulations cast within a polyacrylamide gel sandwiched between two buffer chambers. A vertical electrophoresis apparatus is shown in Figure 1.
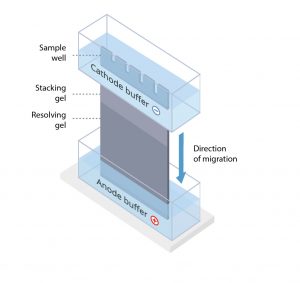
The first chamber is attached to the cathode, where sample loading wells are exposed, and a second chamber is attached to the anode at the terminal end of the gel. A voltage is applied, and proteins travel through the gel towards the anode.
Protein size and the density of the gel matrix determine the speed of separation; smaller proteins migrate faster than larger proteins.
High-quality separation is required for accurate protein identification and quantification. The appropriate gel characteristics and sample loading concentrations must be used to ensure adequate separation.
Polyacrylamide Gels
Polyacrylamide gels are used as a separation matrix.
Being strong, hydrophilic, thermostable, transparent and relatively chemically inert, this ensures no breakages or melting during the procedure and that the proteins are easily visualized.
Chemical reactions do not interfere with protein migration, and pore size, which is controlled by the gel’s density, can be varied.
Discontinuous Polyacrylamide Gels
Most gels used in PAGE are formed from two gel regions: a stacking gel made from a lower density gel and a resolving gel of higher density.
Smaller proteins migrate quickly through the stacking gel and have impeded migration through the resolving gel.
Larger proteins migrate slowly through the stacking gel and may not permeate the resolving gel.
Gradient gels
Gradient gels are used to allow proteins over a range of molecular weights to be resolved in the same assay, allowing separation of both low and high molecular weight proteins from the same sample. The choice of gel depends on the protein separation required.
Polymerizing and Casting gels
Polyacrylamide gels are made by polymerizing a solution of acrylamide monomers and N, N’-methylene-bisacrylamide cross-linkers by chemical or photoinitiation. Chemical initiation of polymerization uses compounds such as ammonium persulfate to initiate the reaction, and N, N, N’, N’-tetramethylenediamine to stabilize the chain reaction. Photo initiation of polymerization uses riboflavin, which is added to the solution and exposed to long-wave ultraviolet light between glass plates and covered with water-saturated butanol. This excludes molecular oxygen, which inhibits the chain reaction.
The gel’s density is determined by the concentration of the acrylamide monomer and bisacrylamide cross-linkers. Increasing the acrylamide concentration increases the gel density. A wide variety of precast gels in a range of thicknesses are available, but hand casting gels is a Ph.D. rite of passage.
High molecular weight proteins
PAGE can be used to separate proteins ranging from 5 to 200 kDa. For large molecular weight proteins (700–4,200 kDa), agarose gels offer better separation than polyacrylamide gels.
| Percentage Acrylamide | Size of Proteins |
|---|---|
| 15% | 10–50 kDa |
| 12% | 40–100 kDa |
| 10% | 70 kDa > |
Buffer pH
pH affects protein migration; consequently, running buffer pH must be above the proteins’ isoelectric point to maintain their net negative charge, so they travel towards the anode. Continuous density gels use the same buffer in both chambers, while discontinuous gels require a discontinuous buffering system. A Tris-glycine buffer is typically used, with a stacking gel pH of around 7.0 and a resolving gel pH between 8.0 and 9.0. Other specialized buffering systems can be used when required. For example, Tricine buffers are ideal when separating proteins/peptides of very low molecular weight.
Disulfide bonds can form between cysteine residues in a high pH resolving gel. To counter this, a reducing agent can be added to the buffer. If native PAGE is being performed, a zwitterionic amino acid, such as tricine, with a buffering range of pH 7.4 to 8.8, may be added as an alternative solution.
Determining Protein Size with Molecular Weight Markers
Protein size is calibrated against molecular weight markers. These consist of a range of proteins with known molecular weights that run in a parallel lane at the same time as the sample.
An unknown polypeptide’s molecular weight can be estimated by calculating the relative distance of migration (Rf) of the marker compared to the distance traveled by the protein of interest. Molecular weight markers are also a useful indication of protein transfer efficiency.
Prestained molecular weight markers can be used to monitor the progression of protein migration during electrophoresis. Markers may also be visualized by temporarily staining the membrane with dyes, such as Ponceau S, before the addition of immunoreagents. Unlabeled markers can be visualized after electrophoresis by staining with Coomassie brilliant blue or silver if the gels are not to be immunoblotted.
| Issue and Cause | Solution |
|---|---|
| Weak/Faint Bands Or “Bulging” Bands: Weak/faint or “bulging” bands signify that the protein concentration is too high or too low. | Before electrophoresis, the total protein concentration should be calculated using methods such as the Bradford, Lowry, or BCA assay and a suitable protein concentration per well is estimated before loading onto the gel. |
| “Smiling” Bands: Your buffer has been made incorrectly, or you are running at the wrong voltage. This causes the buffer/gel to heat up, changing the pH of the buffer and changing the relative charge of the migrating proteins, therefore those nearest the edges of the gel, where it is warmest, are impeded – causing smiling. | Check the composition of your running or gel buffers. |
| Check at what voltage the tank is being run. | |
| Sample Turns Yellow: This happens when using a running buffer, of the wrong composition, or pH. Often the pH is on the acidic side. | Make a new buffer. |
| Smeared Bands: This happens when the sample is not prepared properly. It may be insufficiently reduced and denatured. Alternatively, the ionic strength may be too high due to overly high concentration of salts such as sodium chloride or denaturants such as guanidine hydrochloride. | Add fresh reducing agent to sample loading buffer before use, and ensure you boil for a minimum of 5 minutes at 100oC. Keep salt concentrations below 500 mM, where possible. |
| Orphans: Bands that appear to be split between lanes or show bleeding can be caused if the sample is loaded inadequately | When loading sample wells, avoid spilling sample out of wells by ensuring that the buffer level is above the well, that sample density is sufficient to carry sample to the bottom of the well, and that the well is not overfilled. Colored sample loading buffers such as laemmli help visualize the loading process. |
| Multiple Bands and Unexpected Bands: Multiple bands, unexpected bands and bands present at unexpected weights indicate inefficient separation and are associated with degraded, oxidized, or dephosphorylated proteins. | SDS, fresh reducing agents and phosphatase inhibitors added to the buffer can reduce the incidence of protein interactions. |
| Use protease inhibitors to prevent protein degradation or truncation. Inclusion of sodium azide in buffers aids in preventing microbial growth. | |
| Use a positive control to confirm protein identity. Check the sequence using bioinformatics tools to predict possible truncation or susceptibility to degradation. |
Negative Tissue Controls
Negative controls use a cell or tissue sample known not to express the target protein. When these are run alongside the unknown sample, no control band should be detected at the same size as the target protein. Negative controls are run to identify non-specific detection by the primary antibody. A negative control signal indicates that the primary antibody interacts with proteins in the sample other than the protein of interest, such as endogenous proteins produced during culture.
Another useful negative control is an immunoblot where the primary antibody has been left out, often referred to as a no-primary antibody control. Positive signals in such controls indicate direct binding of the secondary antibody to proteins in the sample. For example, a western blot using a mouse tissue sample could yield a positive signal if the sample contains mouse IgG, which would be detected by an anti-mouse-HRP-conjugated secondary antibody.
Loading Controls
Loading controls are used to assess the consistency of PAGE, and the signal generated by them may be used to normalize assay results between wells during quantitation.
One form of loading control is to measure the signal from a protein spiked into each sample. This can be used to confirm even transfer from the gel to the membrane during electroblotting and may be used to normalize signal between wells during analysis. Housekeeping proteins expressed in the tissues or cells composing the sample, such as -actin, can be used as loading controls. In particular, they confirm that wells are loaded with the same amount of sample and may identify sample handling differences.
Found Part 2 of our Western blotting guide useful? View part 3 here
References
- Blancher C. et al. (2001). SDS-PAGE and Western Blotting Techniques. Methods in Molecular Medicine. doi: 10.1385/1-59259- 136-1:145.
- Lee C. (2007). Protein Extraction from Mammalian Tissues. Methods in Molecular Biology. doi: 10.1007/978-1-59745-257-1_29
- Jackson ImmunoResearch Laboratories Inc. (2017). Western Blotting Troubleshooting Guide! https://www.jacksonimmuno.com/ secondary-antibody-resource/technical-tips/western-blot-trouble-shooting/
- GE Healthcare. (2011). Western Blotting Principles and Methods. https://www.sigmaaldrich.com/content/dam/sigma-aldrich/ docs/Sigma-Aldrich/General_Information/1/ge-western-blotting.pdf
- Najafov A. et al. (2017). Western Blotting Guru. Elsevier Inc. https://www.sciencedirect.com/book/9780128135372/western- blotting-guru
- Bass J.J. et al. (2017). An Overview of Technical Considerations for Western Blotting Applications to Physiological Research. Scandinavian Journal of Medicine and Science in Sports. doi: 10.1111/sms.12702
- Lewis M. (2018). A guide to selecting control and blocking reagents. Jackson ImmunoResearch Laboratories Inc. https://www. jacksonimmuno.com/secondary-antibody-resource/technical-tips/controls-diluents-blocking/

| Learn more: | Do more: |
|---|---|
| Colorimetric western blotting | Spectra Viewer |
| Chemiluminescence western blotting | Antibodies for signal enhancement |
| Fluorescent western blotting | |
Technical Resources | About us | Contact us | Bulk Service
Licenses | Conditions of Use | Privacy Policy | Ordering Information

FM 545248